25Nov
Using Custom Address Label Sheets in VETLINKSQL
Client Labels can be printed from Reports | Report / Lists | Client | Client Address Labels or from Bulk mailers or Reminders / Recalls by clicking on the Labels button. The template used from these locations is a set template that prints to pre-cut labels available for purchase from VetlinkSQL. It cannot be adjusted.
To print to labels purchased from third party retailers, or change the label text to include things such as animal name you can create a template in Bulk Mailers or Reminders / Recalls using the Mail Merge setting in Microsoft Word. To set this up follow the steps below.
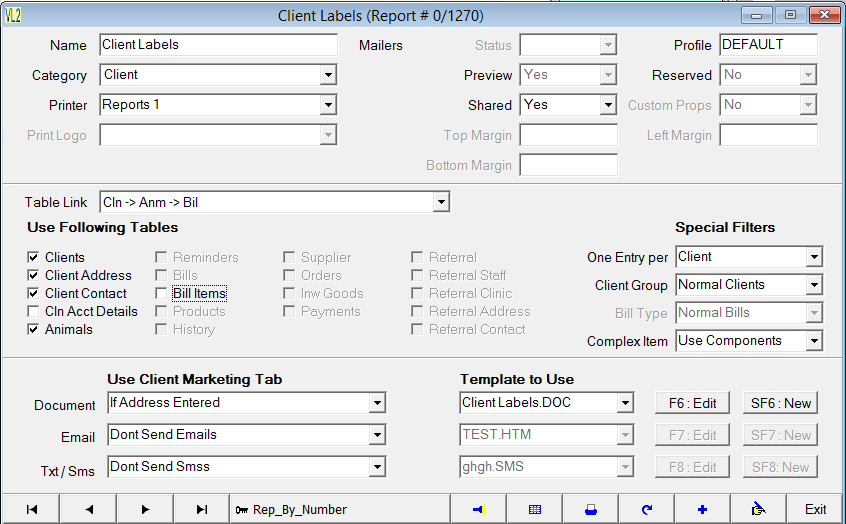
Set up Bulk mailers or Reminders/Recalls Template
- Go to Reports -> Bulk Mailers -> Add New
- Select Yes to Design new Report
- Select the Properties for the Bulk Mailer
-
- Give the labels a Name
- Select Category in bulk mailers to assign template to, eg Client
- Select Printer. Usually Reports1 for A4 printing.
- Select Table Link. Cln -> Anm -> Bil works best for most situations
- Tick tables to use under Use Following Tables. Clients, Client Address, Client Contact and Animals works best for most situation. You can tick the Bill and Product fields if you want to filter by those fields as well however the search may take longer.
- Set One Entry per to Client if you require one label per client or Animal if you require one entry per animal.
- Under Use Client Marketing tab drop down the list next to Document and select If Address entered if you want to print a label if they have an address. If you are using the Send By Mail flags under the Marketing tab of the client record then select If Mailers Chkbox ticked in By Post.
- Click SF6: New to create the label template.
- For Document Template choose Word Document Blank and give enter a Filename. This could be the same as the bulk mailer name.
- Click Accept Word will open.
Create Label Template in Microsoft Word
Chances are that you already have a package of label sheets from one of the label sheet suppliers, such as Avery, AOne, or Formtec. Each sheet is a certain size and contains a certain number of labels with specific dimensions. To set up the label main document, you need to match the dimensions of that document with the dimensions of the labels on the sheets that you have on hand.
- Make sure you are on the Mailings tab.
- In the Start Mail Merge section, click Start Mail Merge.
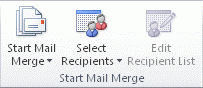
- Click Labels.
- In the Label Options dialog box, you have several choices to make.
-
- The type of printer that you are using to print labels
- The supplier that produced your label sheets
- The number that corresponds to the product number listed on your package of label sheets.
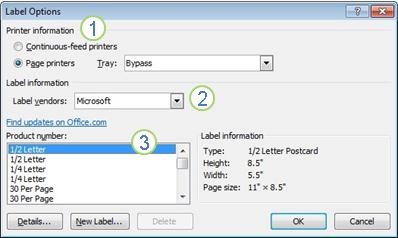
- Under Printer information, click the type of printer that you will use to print the labels.
- In the Label vendors list, click the name of the company that made the label sheets that you are using.
- In the Product number list, click the product number that is listed on the box of label sheets.
- If the product number for my label sheets doesn't match any of the choices in the Label Options dialog box you can still print your labels. You just have to do some customizing.
-
- After measuring the labels and counting the number that fit onto one sheet just choose a similar template and use that.
- If the dimensions and layout do not match yours, click New Label.
- Type a name in the Label name box, select the height, width, margins, and other options for your label, and then click OK.
- The new label appears in the Other/Custom category. The next time you create custom labels you can use that.
- After you select the label options that you want, click OK.
- Word will create a document that contains the sheet of labels. Word uses a table to lay out the labels. If you don't see lines separating the labels, click the Layout tab under Table Tools, and then in the Table group, click View Gridlines.
- Set up your label by typing the text you want in the first label box. You can add mail merge variables by clicking on the Insert Merge Field Button.
- To copy detail to other labels click the Update Labels button. A <> mailmerge item will be placed on top each label so word knows to select the next client / animal record when merging details.
- Save and exit the template